How to: Add Project Users and Groups in Project Tasks
For Professional Edition
1. From Project Center click Utility…Users and Groups buttons. The Users and Groups screen is displayed.
2. Click the Add button will bring up the New User screen. Enter the user information in the General tab.

3. To assign the user in groups or projects click the User Group tab and check the project’s check box. Then click OK to return to the Users and Groups screen.
a. To import users from Outlook Contact List simple click the Import From Outlook button from the Outlook Contacts screen highlight the user and click OK will add the user.
4. To group the users in each project simple click the project from the Groups tab then click the Property…User buttons and check mark the user's check box then click OK. You will be able to know which team members are assigned to the project.
a. To create User Groups. From the Groups tab click the Add button. Give the Group a name by entering in the Name field. Click the OK button will add the User Group.
5. Click the Close button to return to the Project Center.
For Workgroup Edition
Only Administrator or Project Manager have the privilege to add project users in EasyTaskLink Workgroup and Enterprise Edition .
1. From Project Center click Utility…Users and Groups buttons. The Users and Groups screen is displayed. Click the Add button will bring up the Add User screen.

2. To add the user already in the system to the project plan simple select the user from the drop down menu. To assign the user to the User Groups check the checkbox next to the group in the bottom half of the Add User screen.

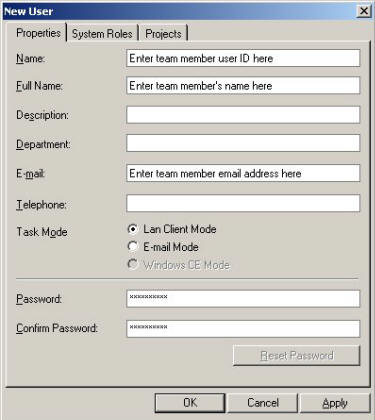
3. To add the new user to the project plan click the New button will bring up the New User screen. Enter the user information in the Properties tab. Setup the Task Mode format for your team member to receives task assignments and filing status reports.
LAN Client Mode - For users that are receiving task assignments using LAN connection.
E-mail Mode - For users that are receiving task assignments via Outlook.
a. To import users from Outlook Contact List simple click the Import from Outlook button. From the Outlook Contacts screen highlight the user and click OK will add the user to the system.

4. Click the System Roles tab to assign the user the Administrator and Project Manager role.
5. To assign the User to a project click the Projects tab then check the checkbox next to the project.
6. If User Group already setup. To assign the user in a Group. Check the User Groups checkbox in the lower half of the User Groups screen
7. Click the OK button will save the user in the system.